Sew Together Bag

Tags

, , , ,

Sew Together Bag

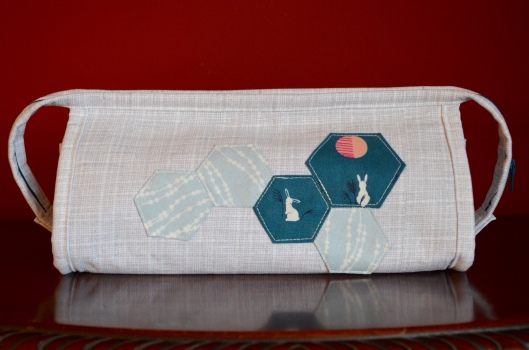
This was my New Year’s project, the Sew Together Bag by Michelle at Sew Demented. After hemming and hawing over four different color combinations (brights? linen with a patchwork stripe? Liberty?), I settled on a pale gray crosshatch with an abstract arrangement of hexies featuring fussy cut Moon Bunnies from Rashida Coleman Hale’s Mochi line. I used Moon Bunnies for the lining as well.

DSC_0151.jpg

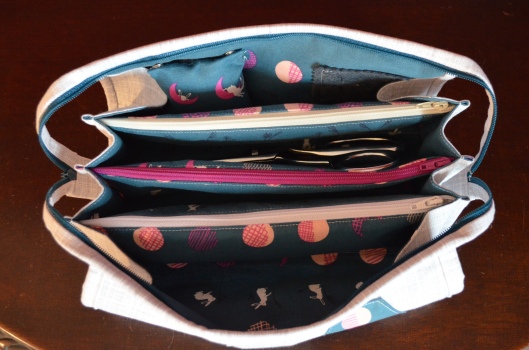
It was important to me to pick fabrics for this project that I wouldn’t tire of quickly. It’s a daily-use bag, holding my scissors, rotary cutters, favorite thimble, and best glass head pins. The gray crosshatch is a favorite of mine, a shade of pale gray from Joann’s own line that pairs with just about everything. I’d been saving the Moon Bunnies for something special and love how the whimsical print appears when the bag is open. Those lively little bunnies make me smile.

You’ve probably seen this bag all over Pinterest and Instagram, with good reason. It’s a great combination of practical (stores lots of stuff!), flexible (looks great in lots of colors and prints!), and cute (accordion-style! handles made out of the zippers!). It’s well worth making. It is not, however, a throw-it-together-in-an-hour project. Parts of the bag are tricky to navigate due to bulk and require patience. There are a few steps in the pattern, like sewing on the side bindings, where an additional photo or two would be helpful. You’ll also need to guess at the placement of any decoration you put on the outside of the bag. It’s not immediately obvious how much of the exterior will become the bottom of the bag. (My suggestion: any horizontal decoration should be within 1.5” to 3” from the top zippered edge of the bag.) I found a Sew Together Bag sew-along at Quilt Barn that provided helpful step-by-step photos to supplement the pattern.

DSC_0149

That said, this is one of those patterns that you’ll probably re-make for yourself and for gifts.  Can’t you see this in a dark linen as a man’s toiletry bag, or a cheerful oilcloth for a child’s travel art kit?

robert kaufman indigo washed cotton linen
mod apple oilcloth


(Speaking of oilcloth, did you know they make chalk oilcloth?? I just found out. Write on, wipe off. Holy moly. I see lots of smocks and aprons in my future.)

Oh, and one last word from the wise(ish): Buy those zippers a bit long. I used 12” zippers in place of the 9” ones and was able to avoid having to be precise about centering. It’s the little things.

Happy sewing!

Happy New Year!

mini zip pouches

Hello, and happy 2016 to you!

It’s been quiet around here because it’s been so busy in my brick-and-mortar world. Among other chaos, my kitchen looked like this for much of December:

IMG_4616

Just in case you haven’t tried it, two weeks before Thanksgiving is the perfect time to dismantle part of your kitchen. Really. There’s nothing like two looming holidays to motivate you.

Yes, that’s sarcasm. =)

Seriously, though, I’ve found that if I wait for the perfect time to start these projects they never happen. Although things have improved since the picture above – the cabinet doors are painted and back on, for starters – we have more work to do. I’ll post some before-and-after shots in (hopefully) a few weeks.

fleece infinity scarf

I did get a little bit of sewing in before Christmas, though. In November I made a dozen minky and jersey infinity scarves and lots of little zip pouches. Both are simple, quick, and satisfying projects. The scarves are the same minky-and-jersey type that have been my go-to for a few years, using minky dot from Hawthorne Threads, Pink Chalk Fabric’s pattern, and soft jersey knit. This year I picked two prints from the Skopelos line for the jersey and paired them with navy and cream minky. The tiny pouches were made with this pattern from So Sew Easy and various fabrics and zippers from my stash. I ended up making extra because the kids kept stealing them to store their treasures!

Laura Ashley country roses needlepoint

I also finished up a UFO from the 1980s. This Laura Ashley needlepoint had been stitched and rolled up in a pillowcase for decades. I finally blocked it and noticed again how pretty it is, and decided to make it into a pillow. To give it a bit more of a 21st century pop, I used a hot pink linen for the backing and trim.

I feel like 2015 finished up with some loose ends but was pretty good overall. I did a lot, which is positive, but got stuck in a few places, which means there’s room for growth. I think I’m going to adopt a simple mantra for 2016, rather than make resolutions.

How did your year wrap up? I’m curious – what was your favorite project of 2015? If you feel like it, please share a link in the comments so I can see what you’ve been up to!

Simple Sewing

Tags

drawstring bags


I’ve stayed up late the last two nights sewing and sewing, watching an entire season of Broadchurch while making pretty drawstring bags. They are all different colors and sizes, some with contrast trim at the top and some without, based on this pattern. It’s satisfying, straight-forward, peaceful work, especially with a lit tree nearby and the decorations on a neighbor’s balcony cheerfully twinkling at me through the window.

I’m not doing eight quilts for Christmas this year but there will be a number of handmade gifts under the tree. I wouldn’t feel like myself if I didn’t make something. Are you making any of your gifts this year? If so, what?


Missouri Star

Tags

Missouri Star pillow

My grandfather turned 96 in August. He’s a child of the Midwest, a father of eight, a Harvard Business School graduate who never went to college, the founder of the first radio station in southwestern Missouri and of Channel 38 in Boston, a former Fidelity VP who also worked for NASA, and an electronics whiz who installed and taught the use of radars for Doolittle’s Raiders.

Yes, you read that right. My grandfather has done some very interesting things in his 96 years.

When I was little I knew none of this, though. I knew that my grandfather was a vegetarian with a sweet tooth and a Christmas tree farm who could do a flip off a diving board well into his 60’s and went to church every Sunday. That he’d decide to build a two-car garage and end up with a second floor guest suite, too. That he’d always have a tree swing in the backyard for the grandkids, and that despite living in New England for half a century, he never lost the Ozark twang in his voice. And all that is pretty darn cool, too.

These days my grandfather lives half a country away. Although he tires easily, his mind is still sharp and his memories are priceless. I thought, when I went to make him something for his birthday, that I’d keep those things in mind – his sharp intellect and his connection to the past. I chose a Missouri Star block for its history and the fabrics for their evocative nature, and put them into a pillow for comfort.

Missouri Star pillow detail

The Missouri Star block is a traditional one and my grandfather immediately picked up on it; it reminded him of the quilts his mother made for friends and family. I used blues and soft grays, looking for patterns that were masculine but expressive – wheeling birds, a navy and white print that, when cut into small parts, made me think of rough grasses; pale blue and gray crosshatch like worn and well-loved shirts.

Happy birthday, Grandaddy.

Blueberry Season

Tags

,

blueberry pudding cake

The stores around here were full of blueberries at ridiculously good prices last week. When that happens, I make this cake. It’s not a Cake cake. No frosting, kinda messy, lots of berries and sauce. It’s more like a pie in cake form. In this house, we eat it for breakfast. And lunch.

The original recipe is by Melissa Roberts-Matar, printed in Gourmet magazine, July 2005. I’ve tweaked it slightly to my taste. If you want to try the original, you can find it on Epicurious.  My version is below.

BLUEBERRY PUDDING CAKE

Serves 8

1/3 cup plus 1/2 cup sugar

1/4 cup water

1 1/2 tablespoons lemon juice (I just squeeze half a large lemon and call it good)

1 teaspoon cornstarch

2 pint containers of blueberries

1 cup flour

1 3/4 teaspoons baking powder

1/2 teaspoon salt

1 large egg

3/4 cup whole milk

1 stick (1/2 cup) butter, melted and cooled slightly

1 teaspoon vanilla

  • Preheat the oven to 375 degrees. Butter an 8″ baking pan. (I use a basic glass pyrex baking pan.)
  • Stir together 1/3 cup sugar with water, lemon juice, cornstarch, and blueberries. Bring to a simmer and cook, stirring occasionally, until most of the berries have broken and the sauce is a deep purple (about 5-6 minutes). Remove from heat.
  • Whisk together flour, baking powder, salt, and remaining 1/2 cup sugar in a medium bowl. Add the egg, milk, butter, and vanilla and whisk until just combined.
  • Pour the batter into the baking pan and spread it out evenly. Pour the berries over the top. Some berries will sink and some of the batter will bubble up.
  • Bake until a knife or toothpick inserted into the center of the cake comes out clean, about 30 minutes. Cool for at least 10 minutes before serving. The cake will sink as it cools and the sauce will thicken up a little.

This cake keeps well on the counter for a day or two if kept covered in foil.

On My Bookshelf: A Dangerous Place

Tags

, ,

dangerous place coverJacqueline Winspear’s Maisie Dobbs series takes a darker turn with A Dangerous Place.

Reeling from tragedy, Maisie isolates herself from her usual crew of friends and family in an attempt to heal. While avoiding home with a stop in Gibraltar, Maisie stumbles across a dead body and a tiny flame of investigative curiosity ignites in her damaged psyche. As Maisie digs deeper into the life of the murdered man she also learns more about the war raging over the border in Spain and the complicated politics feeding the conflict.

This is Maisie at her darkest, a reflection of both the trauma in her life and the black clouds gathering over the world political stage. And yet she is still the Maisie Dobbs readers have grown to love over the course of the series: resilient, truth-seeking, thoughtful, and compassionate. Maisie’s struggle to right herself rang true and kept me reading even when the politics of revolutionary Spain lost me, but I did miss the presence of Maisie’s long-time assistant, Billy, her best friend, Priscilla, and her father, Frankie. Winspear’s writing is, as ever, elegant and meticulously researched, portraying not just historical facts but the atmosphere of the time through the lens of Maisie’s observant eyes.

As a fan of the Maisie Dobbs series, I see how this book fits into the story arc but I did find it to be a more difficult read than earlier books. The jump from Leaving Everything Most Loved to A Dangerous Place is a big one, covering four years and a large piece of Maisie’s personal life in a few letters, and it lacks some of the relief from Maisie’s seriousness that Billy, Priscilla, and Frankie provide. And yet, I am looking forward to seeing where Maisie goes next. A Dangerous Place leaves her at a turning point, deep in the Spanish Civil War, on the brink of WWII, and about to begin again.

Out of the Blue

Tags

, ,

Camel

Sometimes something comes along that catches you by surprise and leaves you with a big grin on your face and a little tear in your eye. I recently came home from a weekend away to find a box on my doorstep that turned a lovely day into a golden one.

In the early 1940s, my grandmother made a this toy camel for one of my aunts. The Camel with the Wrinkled Knees, of Raggedy Ann fame. He had black button eyes, a yellow saddle, and red feet. His stitching was perfect.

The camel was handed down from sister to sister and thirty five years ago the youngest gave the camel to me. He traveled with me until my aunt wondered aloud on the family website if anyone knew what had happened to him. It seemed important that she see him again, so Mr. Camel went into a box and off to Tennessee.

Camel package

Birthday 1944Seven years later, my aunt has returned the favor and then some. The box on my doorstep not only held Mr. Camel but the original pattern (McCall 914, $.35, copyright 1941), a copy of Raggedy Ann and Andy and the Camel with the Wrinkled Knees, and a picture of my aunt, age 3, on her birthday with Ann, Andy, and Mr. Camel. Such a sweet little face.

My aunt sent me a note, too, to be prized with the rest, in which she writes about the camel, the dolls, where they lived at the time, and how she pored over the pictures in the Raggedy Ann books as a child.

What a gift, this peek into her childhood and a vintage pattern and book for the sewist and reader! My little one immediately sat down with the book and the camel and started poring over the pictures, just as my aunt did as a girl. I took a photo, which I will send back to her. I think she’ll appreciate it.

Linen Bags for Summer

Tags

,

I went on a bag-making spree in June. For my mother, a color-blocked cross-body bucket bag. For me, rope-handled tote with a matching zip pouch.

041
032

The color block bag is from a pattern in Modern Patchwork Magazine, Spring 2015. I used the instructions in the magazine pretty much to the letter and was pleased with how the bag turned out. It’s bright and cheerful and a good size for a wallet, sunglasses, book, and light sweater. Not too big; not too small.

011

Materials: Essex linen in natural for the exterior, Essex linen in hot pink for the lining, and various scraps from my stash for the color blocks. The 10″ zipper is from ZipIt.

013

My bag is a slight adaptation of Anna Graham’s Caravan Tote. I used the handle style and placement from this tote featured on the Hawthorne Threads blog, modified the lining and needle pockets a little, and I left out the exterior pouch pocket. Oh, and I skipped the heavier interfacing. I may regret that choice down the road, but it seemed like it would be so bulky to sew through when I was already using linen on the exterior. I’ll probably make this bag again in another print and will try the additional interfacing. So far, though, no complaints! I’m quite happy with it. It may seem like I changed a lot from the original Caravan pattern but I really did follow all the essential construction steps for this bag. I know how to make a basic lined tote without a tutorial but this one involves zippers (my nemesis) and multiple linings, and I wanted to make sure I got it right.

021
035 033
037
Materials: Sunshine and Essex linens on the exterior, Priory Square prints for the linings, rope handles and gold swivel clasps from Joann’s, 14″ red zipper from Zipper Island.

Fourth of July Pinwheel Quilt

Tags

,

Fourth of July pinwheel quilt

I finished up my Fourth of July pinwheel quilt just in time to take it to the local fireworks display – hooray! My kids happily curled up under it, which pretty much made the evening for me.

This quilt is made up of 20 pinwheel blocks (tutorial here) and stipple quilted. The solids are Robert Kaufmann Kona, the backing is a gray batik and the binding is a red and white chevron of unremembered origin.

I’m quite taken with this quilt, despite (or maybe because of?) the fact that all solids and high contrast is unusual for me.

Hope you all had a fun and festive Fourth of July!

Fourth quilt back detail

Pinwheel Fourth of July Block for the BMQG

Tags

, ,

Hello and happy July! Today I have a tutorial for a pinwheel block that evokes fireworks and Fourth of July pinwheels. It’s part of the Boston Modern Quilt Guild block of the month series. Enjoy!

pinwheel block

The assignment: Create a block in guild colors of dark blue, red, and white
The inspiration: Independence Day! Fireworks in a night sky and pinwheels
Materials needed: 1/4 yard dark blue solid; 1/8 yard each deep red and white solids
Finished size: 12″
Cut:
     8  6.5″ x 3.5″ dark blue rectangles
     4  3.5″ x 3.5″ red squares
     4  3.5″ x 3.5″ white squares
Notes: Square up your pieces after each step to accurately match up your points.
1. Place the red and white squares on the blue rectangles, matching up the top and side edges.
 172
2. Sew from the top left corner to the bottom right corner of the square.
3. Trim 1/4″ from the seam line on the upper/right side of the seam line, as shown.
173
4. Press the resulting triangle away from the blue rectangle.
175
5. Pair up the red/blue rectangles with the white/blue rectangles. You’ll have four pairs. Match up the long edges as shown, overlapping the corners of the red and white triangles, and sew. Press the seam open. Repeat for each pair.
176
 177
6. Arrange the four sections so that the white and red triangles alternate in a pinwheel. Sew the bottom pair together, matching up seam lines, and then the top pair. Press seams open.
178
7. Match up the center seams of the top and bottom sections and sew together. Press seam open.
 181
8. Trim up your block and you’re all set!